
Withdrawals
Where to Find a Bitcoin Transaction ID and How to Check It
A Bitcoin TXID is the 64-character code in a withdrawal or deposit record, on an exchange or in your wallet. Paste it into an explorer to see confirmations, the fee, and your output.
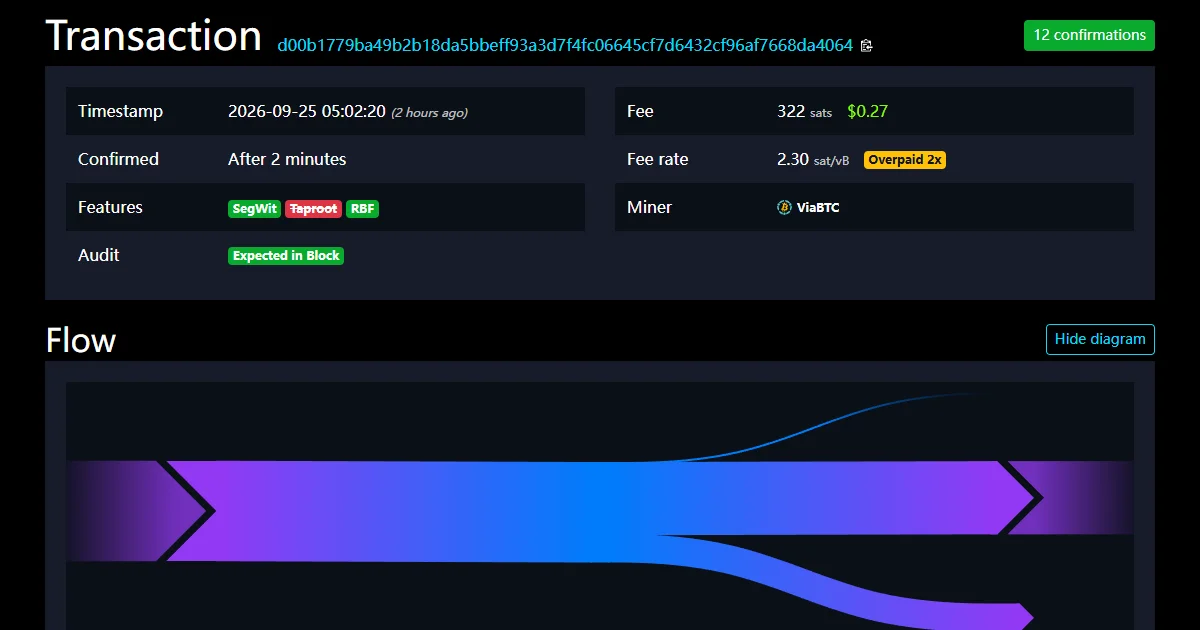
Every exchange and wallet keeps the transaction ID in the record of the withdrawal or deposit. On Binance, it sits in the TxID column of your withdrawal or deposit history. On the website that's Orders → Transaction History. In the app it's Assets → Overview, behind the Transaction History icon, where you tap the record to open it. For a Bitcoin transaction it's a 64-character string of digits and the letters a to f, also called the TXID or transaction hash. Paste it into the search box of a block explorer such as mempool.space, and the page that opens shows whether the transaction is in a block, how many confirmations it has, what fee it paid, and which output went to your address.
Sometimes the column reads [Internal] instead, with an internal transfer ID beside it. The bitcoin moved between two Binance accounts on Binance's own books. No Bitcoin transaction was created, so no explorer will ever find one, and the internal transfer ID is the number Binance Support asks for if something goes wrong. The recipient sees the same ID, also marked [Internal], in their deposit history.
Where Binance keeps the TxID
On the website:
- Log in, open Orders, and choose Transaction History. Binance's older TxID help page reaches the same list through Wallet → Overview → Transaction History, so use whichever menu your screen has.
- Filter the list to Withdraw or Deposit and the asset BTC. Each row shows the time, type, asset, amount, destination, TxID, and status.
- Copy the TxID from the row, or click it to open the transaction in a blockchain explorer.
The filter bar also has a TxID box. Someone sends you a TXID and asks whether it's yours? Paste it there to find the matching record.
In the app:
- Tap Assets, then Overview, then the Transaction History icon on the right. The older help page gives Assets → Spot → Transaction History.
- Choose the Withdraw or Deposit tab and tap the transaction.
- The details screen lists the TxID. In Binance's example it also has Copy Txid and Check Explorer buttons at the bottom.
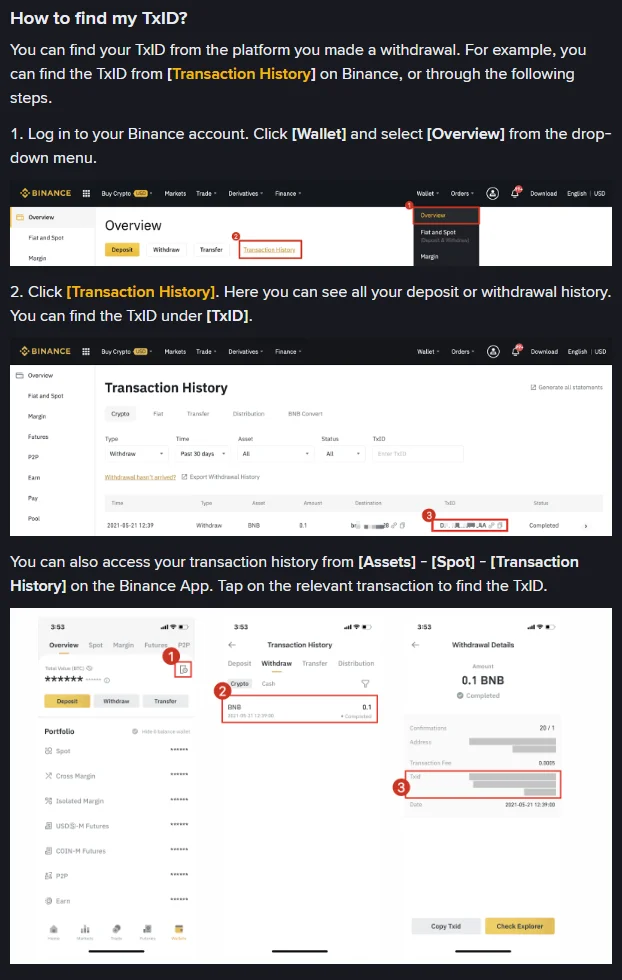
Follow the highlights: Transaction History, the TxID column, then Copy Txid and Check Explorer at the foot of the last app screen. The picture is old, a 2021 BNB withdrawal on Binance's "How to Find My Transaction ID (TxID)?" page (marked updated December 19, 2025), so go by the menu names in the steps above. Those follow the withdrawal guide updated September 18, 2026.
What the TxID column shows
Match what's in the column to one of these.
A 64-character string
That's a Bitcoin TXID, and there's something to look up. Copy all of it with the copy button. Selecting by hand is how a character goes missing, and a TXID with one character missing finds nothing.
Binance draws a line at confirmation. Its withdrawal FAQ says that once an explorer shows the transaction as confirmed, the funds have left Binance and it can't help further. From there, the owner or support team of the destination address takes over.
[Internal]
A withdrawal can go through as an internal transfer when the destination belongs to another Binance account, whether you entered a Binance ID or an ordinary deposit address. Internal transfers carry no network fee and arrive at once. The withdrawal form lets you switch: after you enter the amount, hover over the [i] icon and click Change to toggle between an internal transfer and an On-chain withdrawal. If you need a real TXID, say to show a seller the payment on the blockchain, choose on-chain and pay the network fee.
Nothing yet, and the status says Processing
Binance hasn't broadcast the transaction, so there's no TXID to search. Its withdrawal FAQ says a TxID typically appears within 1 to 30 minutes, and that you can see it as soon as the transaction is created. If the column stays empty much longer than that, work through the no-TXID stage rather than searching explorers.
A string that starts with 0x, or a network called Lightning
A TXID beginning with 0x belongs to an Ethereum-style network. Ethereum writes transaction hashes as hex with a 0x prefix and BNB Smart Chain uses the same format, so on Binance's BTC list that means the BNB Smart Chain (BEP20) or Ethereum (ERC20) row. A Bitcoin explorer won't find it, and the coins you received are a token on that chain, not bitcoin. A Lightning payment isn't recorded in a Bitcoin block of its own either. For Lightning, Binance uses the payment hash where a TxID would go. A Lightning deposit recovery request takes the payment hash in its TxID/TxHash field (Lightning FAQ). Both cases are covered in what to check when the record names another network.
Finding the TXID in your own wallet
When the coins came to or from your own wallet, the wallet has the TXID too. Where to look:
- Ledger Wallet (formerly Ledger Live). In the account's list of operations, tap the transaction to open Operations details, then View in explorer to open it on a third-party explorer. These are the screens on Ledger's transaction tracking page, updated July 8, 2026.
- Trezor Suite. Transactions are listed at the bottom of the account's Overview tab. Click one to open its Details window, where the ID is labeled TX ID. Clicking the timestamp on the transaction line opens it in a blockchain explorer (Trezor's guide to addresses and transaction history).
- Sparrow. Incoming funds appear in the Transactions tab (Quick Start guide). Sparrow also has a transaction viewer that loads any transaction by its ID, so you can inspect it without leaving the wallet.
In other wallets, open the transaction's detail screen and look for a field named Transaction ID, TXID, or hash, or a link that opens an explorer.
Reading the top of the transaction page
Search the TXID in the box at the top right of mempool.space. The page opens with a summary panel. The one below is a stranger's payment, picked only because it's a clean example of a confirmed transaction.
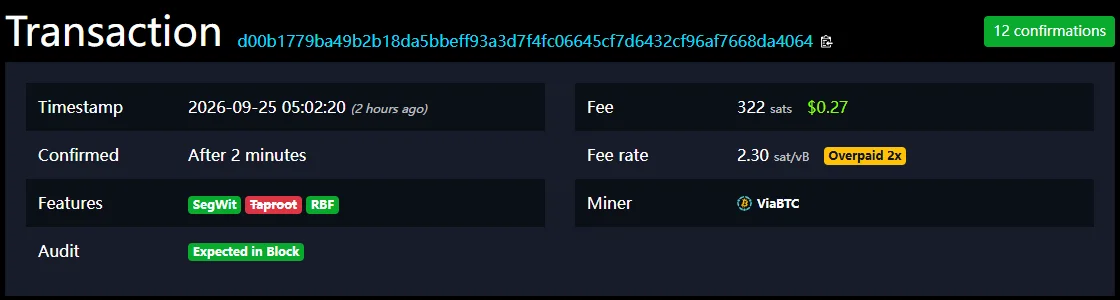
Start with the green confirmations badge at top right, then Fee and Fee rate. Taken at about 07:00 UTC on Sept 25, 2026, two hours after the block, so the count has kept rising since.
Line by line:
- Confirmations (the green badge, top right). The number of blocks from the one holding the transaction up to the newest, counting both. This transaction was in block 968,505, and the newest block at capture was 968,516, so 968,516 − 968,505 + 1 = 12. An unconfirmed transaction shows "Unconfirmed" here instead, and the stage 2 checks cover that page.
- Timestamp. The time recorded in the block, in the time zone picked at the bottom of the site (UTC in this capture).
- Confirmed: After 2 minutes. How long after mempool.space first saw the transaction the block arrived.
- Fee. The whole transaction's miner fee, 322 sats here, with the dollar value beside it. For an exchange withdrawal this isn't your fee: Binance charges its own fixed price, and the miner fee is shared by everyone paid in that transaction.
- Fee rate. Fee divided by size: 322 sats ÷ 140.25 vB = 2.30 sat/vB.
- Overpaid 2x. mempool.space compares the rate with what the block needed, and never counts that need as less than 1 sat/vB. On quiet days, then, anything paying about 1.5 sat/vB or more gets the badge. It's a remark on the sender's fee choice, not on your coins.
- Features. A green tag is something the transaction uses, and a red tag with a line through it is something it doesn't. SegWit is green here, Taproot is struck through because it doesn't use Taproot, and the green RBF tag means the sender could have replaced it with a higher-fee version before it confirmed.
- Miner and Audit. The mining pool that found the block, and whether mempool.space expected the transaction in it. Neither needs any action from you.
Finding your output
Further down, Inputs & Outputs shows where the money came from and where it went.
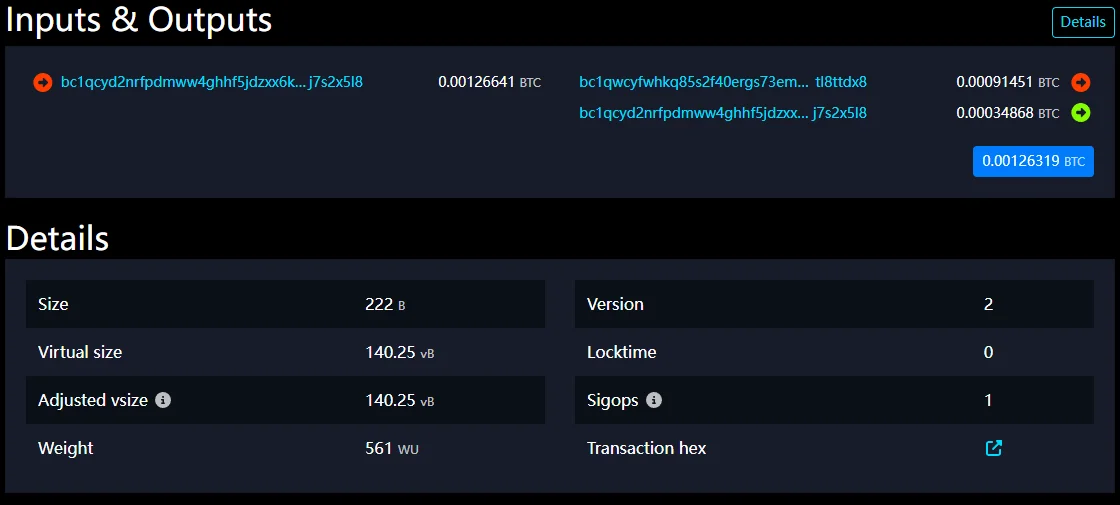
Same transaction, lower half: inputs on the left, outputs on the right, the blue total under them, and the size figures in Details.
- Left column: inputs. The coins being spent, here one of 0.00126641 BTC (126,641 sats).
- Right column: outputs. Each payment the transaction makes, with its address and amount.
- Blue total. The outputs added up: 91,451 + 34,868 = 126,319 sats. It leaves out the fee, which is the difference between the two sides: 126,641 − 126,319 = 322 sats, the figure in the top panel.
To find yours, compare the addresses on the right with the one you gave the sender. mempool.space shortens long addresses in the middle, so check the opening and closing characters first, then click the address to see it whole. When it matches, the amount beside it is what you received.
The arrow at the end of each output row tells you whether that output has been spent since. Green means still unspent. Red means a later transaction spent it, and the arrow links to that transaction. Here the first output has already moved on and the second hasn't.
The second output also goes back to the same address as the input. That's the sender's change, and sending it back to the same address makes the sender's coins easy to connect. Change addresses explains the usual practice. A Binance withdrawal looks different: one transaction often pays many customers, and finding your row in a batch walks through that layout.
The Details panel gives the size. Virtual size is weight divided by 4, so 561 WU ÷ 4 = 140.25 vB, the number the fee rate was calculated on.
How many confirmations count as arrived
The badge counts blocks. Whoever you're dealing with decides how many are enough:
- Binance deposits. When we checked Binance's published network settings in September 2026, a BTC deposit was credited after 1 confirmation and could be withdrawn after 2.
- Ledger Wallet. Pending means no confirmations yet, Confirming means at least one, and Confirmed means the required number is reached. By default that number is however many blocks fit in 30 minutes, and you can change it in Settings → Accounts → Crypto assets. Coins can only be sent on once the transaction that brought them is confirmed.
- Trezor Suite. The timestamp on the transaction line reads "unconfirmed" until the first confirmation, then changes to a date and time.
So a transaction with 1 confirmation can show as received in one app and still Confirming in another. Neither is wrong. Each confirmation also makes the transaction harder to reverse, which is why exchanges ask for more than one before they credit or release coins.
"Transaction not found"
If mempool.space doesn't know the TXID, it says so and keeps waiting:

What an unknown TXID gets you: "Transaction not found," and a page that keeps watching.
The page doesn't say why. Check these in order:
- Count the characters. A Bitcoin TXID is exactly 64. Copy it again with the copy button rather than by hand.
- Look at the first two characters.
0xmeans another blockchain, as above. - Check the network. mempool.space runs separate Testnet3, Testnet4, and Signet explorers, listed in its footer. A mainnet TXID won't appear there, and a testnet one won't appear on the main site.
- Look back at Binance. If the column says [Internal], there's no transaction on the blockchain at all.
- Give it a moment, then try a second explorer. A transaction broadcast seconds ago may not have reached every node yet. The "Waiting for it to appear" page keeps watching and fills in if it does.
If the TXID is complete and correct and still can't be found an hour after Binance marked the withdrawal completed, take it to the withdrawal troubleshooting steps.
What a lookup tells the explorer
The transaction is public. Anyone can open it, and searching it doesn't change anything on the blockchain. What a lookup reveals is you: the explorer's server sees that someone at your IP address was interested in that TXID. mempool.space's privacy policy (updated July 31, 2024) says its web server logs record your IP address and requests and are deleted after 10 days, and it recommends running your own copy of the site for maximum privacy. Binance's Check Explorer button, Ledger's View in explorer, and Trezor's timestamp link all send you to an explorer's server the same way.
Giving someone your TXID reveals more. From it they can open the whole transaction, see your other outputs and change, and follow those coins into later transactions. Share it with the support team that needs it, not in a public forum.
For the everyday question, whether the coins arrived, skip the explorer. Your wallet's own confirmation status answers it without telling a server anything.