
Buying Bitcoin
How to Buy Bitcoin on Binance with a Card or Recurring Plan
A card checkout for one purchase, Convert Recurring for a schedule: where each starts on Binance, where its cost shows, what the card error messages mean, and how to stop a plan.
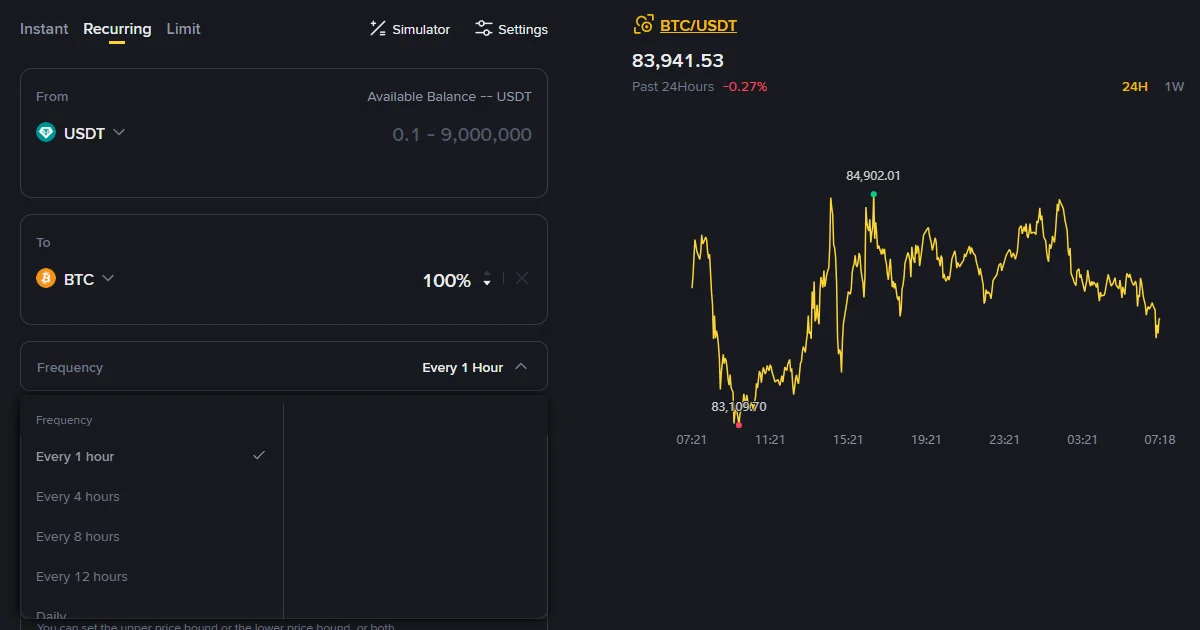
For a one-off purchase, click Buy Crypto in Binance's top menu, enter the amount in Spend, choose BTC under Receive, and pay with Card (VISA/Mastercard). For purchases that repeat, go to Trade → Convert & Block Trade and open the Recurring tab. It buys BTC on a schedule, but only from money already sitting in your Binance account. So the card suits a first buy when your account is empty. The recurring plan suits you once you're moving money into the account anyway and want the buying to happen by itself each week or month.
Each route shows its cost in a different place. The card checkout lists the transaction fee and the price on its confirmation screen, before you press Confirm, and your bank may add a charge of its own. Convert Recurring charges no transaction fee, but it doesn't buy at the Spot price either. Since April 23, 2026, each new plan's spread appears on the Confirm Order page before you subscribe. Neither route has a minimum published in Binance's help pages. The form shows it, so type the amount you actually plan to spend and see whether it's accepted.
Card or recurring plan: which one fits
| Card purchase | Convert Recurring | |
|---|---|---|
| Where to start | Buy Crypto in the top menu | Trade → Convert & Block Trade, then Recurring |
| Pays with | Visa or Mastercard (Apple Pay and Google Pay also accepted) | A balance in your Spot or Earn Flexible account (Funding is being phased out, see below) |
| How often | Once, when you confirm | On your schedule, until you cancel |
| Cost appears as | Transaction fee and price on the confirmation screen. Any bank fee is separate | Spread on the Confirm Order page, with transaction fees shown as 0 |
| Smallest amount | Shown in the form. It depends on payment method, verification level, and region | A range printed in the From box |
| Where the BTC goes | Your Spot or Funding wallet | The Assets Destination on Confirm Order |
For a schedule you mean to keep for months, Convert Recurring is the better fit. The card is built for one purchase at a time.
The two can work together. Convert Recurring pays only from balances already in the account, so the money has to get there first, through a card purchase of the asset your plan spends or through a deposit.
You may still find Binance pages that mention cards "used for recurring buys." The two help articles that explained card-funded recurring buys ("What Is Recurring Buy" and "How to Use Recurring Buy") now return "This article does not exist." If your Buy Crypto screen offers a recurring option anyway, the terms on that screen are the only current description of it. The steps further down use Convert Recurring, which has a live FAQ.
Already holding USDT and after just one purchase? You don't need either route. The Instant tab next to Recurring converts at a quoted price, or you can place an order on the Spot market. When we checked Binance's public market data on September 25, 2026, the smallest Spot BTC/USDT order was 5 USDT, with quantities in steps of 0.00001 BTC (1,000 sats).
How often to buy is its own question. Whether weekly purchases cost more than monthly ones over a year, and what three years of prices say about the schedule, is covered in weekly vs monthly Bitcoin buying.
Before your first order
You need a Binance.com account with identity verification approved. Convert requires it, and the app's card flow asks for it before you can add a card. Binance.com also isn't available in every country: US residents can't use it, and Binance keeps a list of other prohibited countries. If you haven't opened an account yet, set up and secure your Binance account first. That guide starts with the eligibility check.
Then look at your card's currency. Card purchases cover 50 of them. USD, GBP, EUR, CAD, AUD, NZD, ZAR, KES, and PHP are among them, while INR and NGN aren't. If yours isn't among the 50, check which currencies the Spend box offers you before relying on the card route. You can link up to five cards to one account.
In the European Economic Area, Binance's help pages carry a notice that MiCA rules restrict "unauthorized stablecoins." The asset you meant to spend may not be offered there, so use one that appears in your From list.
Buy BTC with a card
The website steps, from Binance's card-purchase guide (last updated December 9, 2025):
- Log in and click Buy Crypto. The Buy & Sell page opens on the Buy tab.
- In Spend, pick your currency and type the amount. In Receive, pick BTC. The BTC amount fills in by itself.
- Under Pay With, choose Card (VISA/Mastercard) and click the buy button.
- If this is your first card purchase, click Add New Card, enter the card details, and click Confirm. A card you've used before shows its status to the right of the card number. An expired card needs Update before it can be used.
- Check the payment details and the transaction fee, then click Confirm. The price and the BTC amount can be recalculated while you're on this screen. The [...] icon next to the quote explains how the price was worked out.
- If your bank asks, approve the payment on its one-time password page.
- Wait for the order to process. On the website, hover over the wallet icon and open Overview to see the BTC.
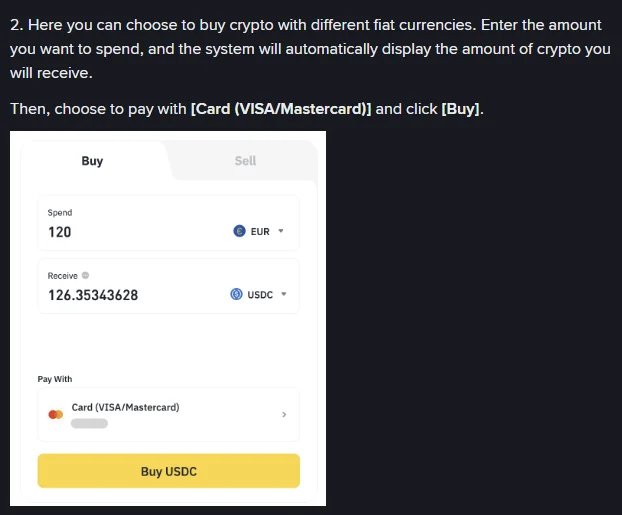
Binance's example buys USDC with EUR. For bitcoin, the one field to change is Receive: set it to BTC.
In the app, the same purchase starts from Add Funds → Buy with in Binance Pro (a separate guide, last updated May 5, 2025), and it asks for the card's CVV after you select the card.
Minimum and maximum amounts depend on the payment method, your verification level, and your region, and the Buy Crypto page is where they're shown. There's no public figure to look up. Type your usual amount, $25 or $50 or whatever it is, and check what your screen shows before you rely on that amount for later purchases.
Less BTC than you expected? Two things explain it: the fee and the conversion rate. Both are listed in the order details under History → Fiat Order. To set that all-in card price against other providers and add the withdrawal fee, use the small-purchase cost comparison.
Card declined, limit reached, or order failed
The messages below are quoted from Binance's card FAQ. Find the one that matches your screen.
"Transaction declined by issuing bank" or "card not supported"
The full messages read "Transaction declined by issuing bank. Please contact your bank or try a different bank card" and "The card you're using is not supported, please change a card and try again." Some banks and card providers block crypto purchases under their own policies. Ask your bank what its rules are for crypto purchases, or try another card, from the same bank or a different one.
The card's issuing country isn't supported
The fix is a card issued in a different country, if you have one. Without one, the card route is closed to you. Check the Deposit tab beside Buy & Sell for other ways to fund the account in your currency.
The card won't link
Adding several cards in a row can mean being asked to wait 24 hours. That wait only affects adding cards, so a card that's already linked still works. If a card fails to link for another reason, try one from a different bank or issuing country. You're also capped at five cards, and a card that pays for a recurring buy can't be deleted until that recurring plan is canceled.
"Remaining limit" appears under the amount
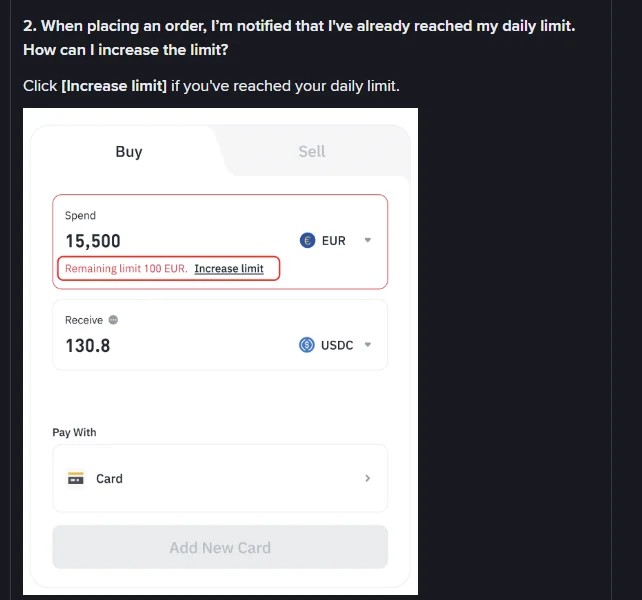
The red line under Spend shows what's left of today's card limit, with Increase limit right beside it.
The amount you typed is over your daily card limit, and the message tells you how much is left today. Click Increase limit and complete the extra verification it asks for, or lower the amount to fit what remains. To see your current limits, or raise them by moving up a verification level, go to Account → Identification from the profile icon.
The order ran out of time
If you don't finish an order within its time limit, it becomes invalid. Start a new one.
The order shows "Failed"
Open History → Fiat Order and find the order marked "Failed." Click the [i] button to read the reason under Unable to Process, and click [Inquiry] if you need Binance Support. If money was taken for a failed order, it goes back to the card, though the refund can take a few days to show on your statement.
Your bank charged an extra fee
Some banks treat crypto purchases as quasi-cash payments and charge for them. The fee comes from the bank, not Binance, so the bank is the one to ask about it.
Set up a recurring BTC buy in Convert
The plan spends a balance, so start with money in the account. If a plan can draw on several accounts, Convert takes from Spot first, then Funding, then Earn Flexible Savings.
The Funding part is changing. Binance announced on September 23, 2026 that it is moving crypto balances out of the Funding Account into Spot between September 29, 2026 and January 2027, after which Funding becomes a "Stocks Account" for stock trading only. Since September 29, recurring orders settle into Spot or Earn, failed-order refunds go back to Spot, and Binance asks users to switch any plan that pays from Funding over to Spot so it keeps running. Hold the money for your plan in Spot.
- Open Trade → Convert & Block Trade (the page is binance.com/en/convert) and click Recurring, between Instant and Limit.
- In From, choose the asset the plan will spend and type the amount for each purchase. The box shows the accepted range. Logged out, on September 25, 2026, it read 0.1 – 9,000,000 for USDT. The range on your logged-in screen is the one that applies to you.
- In To, choose BTC and leave it at 100%. The same box can split a plan across several coins.
- Set Frequency. It opened on Every 1 Hour when we checked, and a plan left there buys 24 times a day. Unless that's really what you want, change it. The list offers every 1, 4, 8, or 12 hours, then Daily, Weekly, Bi-weekly, and Monthly. For weekly or monthly buying, choose that and then pick the day and time.
- Under Advanced Settings (optional), you can name the plan and use two limits. Maximum Period caps the number of purchases, so 12 on a monthly plan stops it after a year. Limit Price sets an upper price bound, a lower price bound, or both, for when purchases can go through. The form also has a Smart DCA switch. It was off when we looked, and the Recurring FAQ doesn't describe it, so read its info icon before you switch it on.
- Continue to the Confirm Order page. Check the amount, the accounts it will pay from, the allocation (BTC 100%), the Spread Amount, the frequency, the Assets Destination, and any limits you set. Then click Confirm.
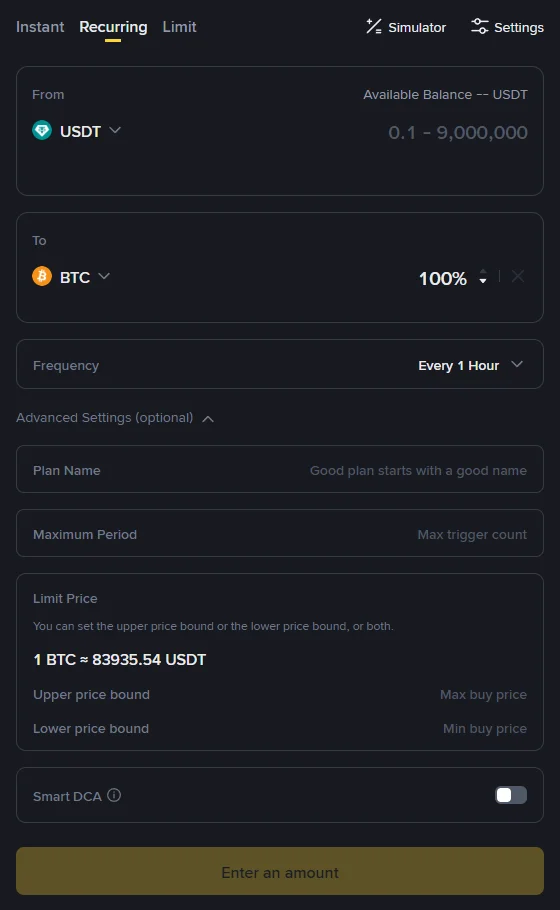
Set Frequency before anything else: it opens on Every 1 Hour. The From-box range is as of Sept 25, 2026.
The spread is the cost to look at. Binance's Recurring FAQ advertises "Zero Fees" and, in the same answer, says recurring prices "may be different from market prices on Binance Spot." That difference is where the cost went. The old Auto-Invest added a fee on top of the quoted price, while Convert Recurring builds its cost into the quote. From April 23, 2026, the spread is displayed on Confirm Order before you subscribe. It's fixed when you create the plan, and editing the plan applies a new one. For each purchase already made, the spread is listed under Recurring Plan Details → Transaction History.
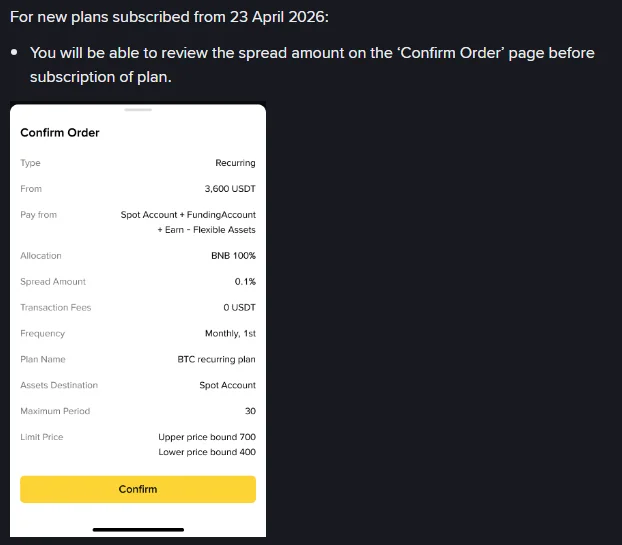
Spread Amount is the line that tells you what the plan costs, since Transaction Fees will read 0. Binance's sample allocates to BNB, so yours should read BTC 100%.
When the scheduled buys run
Two rules set the first purchase (Binance's Recurring FAQ, updated May 13, 2026). Plans that repeat every 1, 4, 8, or 12 hours make their first trade one hour after you create them. Daily, weekly, bi-weekly, and monthly plans run on the date and hour you picked, but the minute copies the minute you created the plan at. Binance's own examples, in UTC+8:
| Plan you set | Created at | First purchase |
|---|---|---|
| Daily at 8:00 | 14:17, March 14, 2025 | 8:17, March 15 |
| Daily at 19:00 | 14:25, March 14, 2025 | 19:25, March 14 |
| Monthly on the 31st, at 17:00 | 14:35, January 31, 2025 | 17:35, January 31, then February 28 and March 31 |
A plan set for the 31st runs on the last day of shorter months. The Plan Start Date and Next Trade Date in the plan details show the approximate minute. In Binance's sample plan list, the time zone sits next to each frequency, as in "Weekly, Tuesday, 15:00 (UTC+8)," so check that yours reads the zone you meant.
Get the money into the account before the scheduled time, not after it. A purchase that finds too little balance doesn't wait for a top-up.
Recurring buy not working, or time to stop it
Purchases are recorded under Orders → Convert History → Recurring History. If a date passes with no purchase there, match your situation below.
- The balance was short at the scheduled time. That purchase fails, and the plan tries again on the next date. It isn't canceled until purchases have failed continuously for six months.
- You set a Limit Price. A scheduled buy only goes through when the price is inside your bounds, so a narrow range can skip dates.
- You set a Maximum Period. The plan stops after that many purchases.
- The form won't take a new plan. You can have 20 plans at most, and paused plans count toward that.
- The plan pays from Funding. When it began moving Funding balances to Spot on September 29, 2026, Binance asked users to change a plan's account selection from Funding to Spot. Try Edit first. If it won't let you change the account, cancel the plan and set it up again paying from Spot.
- You're following an older guide that mentions Auto-Invest. Binance retired Auto-Invest and moved Single Token and Portfolio plans to Convert Recurring. The Index-Linked Plan that stayed behind was shut down too, with no new subscriptions from September 25, 2025 and remaining plans closed after November 27, 2025. If a footer link or old guide still points to Auto-Invest, use Convert Recurring instead.
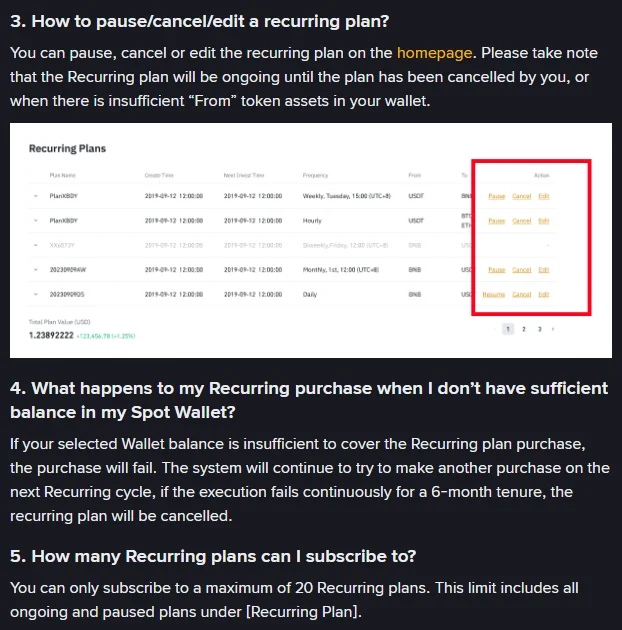
Pause, Cancel, and Edit sit in each plan's Action column. The FAQ text below the table covers failed purchases and the 20-plan cap.
The Recurring Plans list sits on the same Recurring page, below the form. Each plan has Pause, Cancel, and Edit in its Action column, and a paused plan shows Resume. Pause if you'll restart soon. Edit to change the amount or schedule, and remember that a new spread applies once you do. If you're done with the plan, cancel it rather than letting the balance run dry: an empty balance keeps the plan retrying for six months. You also need to cancel before you can delete a card that pays for a recurring buy.
Where the bitcoin goes after each buy
Card purchases land in your Spot or Funding wallet, and with Binance moving Funding balances to Spot through January 2027, check both if you don't see the BTC. Recurring purchases go to the Assets Destination you confirmed, which was the Spot Account in Binance's sample. The BTC stays on Binance until you withdraw it, and every withdrawal pays a fee of its own, separate from any purchase. When to move bitcoin to a cold wallet helps you decide how much to let build up first. When you're ready, withdrawing BTC from Binance to a Ledger or Trezor walks through the withdrawal form and the prompts it can show.